Thursday, May 27, 2010

Daring Bakers: Piece Montée or Croquembouche (May 2010)

The May 2010 Daring Bakers’ challenge was hosted by Cat of Little Miss Cupcake. Cat challenged everyone to make a piece montée, or croquembouche, based on recipes from Peter Kump’s Baking School in Manhattan and Nick Malgieri.

Ahh...the traditional French wedding cake. Different and delicious. This month's challenge came as a relief in some ways. Since I'd just finished my classes at Cookology where we had made creme puffs, I knew I could ace that part of the challenge. *phew*

So, it was with a bit of an "I've got this one" attitude that I entered the kitchen. Honestly, it wasn't until I realized that the cream had to chill over night that I ran into my first problem. (I really do need to get better at reading the ENTIRE recipe before I start.) But, that was easily remedied...I'd just have to wait.

The pate choux recipe that was given worked like a charm for me. I used some of the tips I'd heard at the baking bootcamp classes and passed them along to my fellow Daring Bakers. The two that seemed to be most relevant were: 1) Dump all of the eggs in at once, not one at a time. I don't know why this works, but it does. Keep in mind that you must stir by hand with a wooden spoon and your arm will feel like it wants to fall off before you're done...this is normal. Smile! 2) As soon as the puffs come out of the oven, poke a hole in the top with a really sharp paring knife. This allows the steam to escape and helps the dough to not get soggy, thereby falling.

My puffs puffed beautifully, they stayed beautifully puffed. The creme came out super yummy. I was well on my way to Piece Montee success! It was once I started to fill the puffs that I realized, I shouldn't have halved the creme recipe as suggested. Sure, we were given two recipes (one for vanilla, which I made, and one for chocolate, which I thought I'd make but didn't), but I only made one. I didn't have a lot of finished creme puffs. But I pressed on thinking, "Ahh, no worries, it just won't be as tall!" This turned out to be true...and a bit sad.

The other area where I ran into trouble, I mean challenges which make me a better baker, were the stacking and glazing. Oh sure...chocolate was my choice, but only because making caramel still terrifies me. I know, I know... practice, practice, practice...but I wasn't in the mood to severely burn myself or ruin the few finished creme puffs I had. I don't think my chocolate glaze was much of a success though (as you'll see in the photos below).

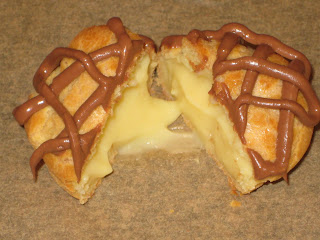
Individually, the puffs looked and tasted wonderful. The filing was creamy and had just the right sweetness. The chocolate added a touch of glamour and the puff itself was airy and light. Ahh....if only the challenge had been to make creme puffs alone....
But, alas, the challenge was to stack these balls of deliciousness into a cone shape and drizzle beautifully. So, I started to stack, using chocolate as my glue. I think it went ok, it worked, it retained its shape and didn't fall over or crumble to the floor. That's success right?! Right?! :::Sigh:::

Once stacked, I turned to the glazing/drizzling part. I had a feeling now that this part of the challenge, which initially sounded like an afterthought, was going to be the most difficult. I was right. My chocolate should have been mixed into a ganache, but I didn't realize that until it was too late. SO, I got this:

Trust me, it tasted great....but I certainly won't be offering to make for a special occastion like a French wedding anytime soon....

This was a good reminder that sometimes, it's the simplest steps that trip us up. Onward....I will conquer caramel....someday....

The Recipe:
Piece Montée or Croquembouche
Preparation time:
 You will want to use your puff pastry batter and chocolate glaze or caramel as soon as it has been prepared and as close to serving time as possible. This is not a dessert that stores well and it may be a bit temperamental in humid areas as the glaze needs to harden to hold the choux together. The crème patissiere can be made a couple of days in advance and stored in the fridge until ready to use.

You will need approximately 10 minutes to prepare the puff pastry, 10 minutes to pipe and about 30 minutes to bake each batch. The crème patissiere should take about 10 minutes to cook and then will need to be cooled for at least 6 hours or overnight. The glazes take about 10 minutes to prepare.

Ingredients:

For the Vanilla Crème Patissiere (Half Batch)
1 cup (225 ml.) whole milk
2 Tbsp. cornstarch
6 Tbsp. (100 g.) sugar
1 large egg
2 large egg yolks
2 Tbsp. (30 g.) unsalted butter
1 Tsp. Vanilla

Dissolve cornstarch in ¼ cup of milk. Combine the remaining milk with the sugar in a saucepan; bring to boil; remove from heat.

Beat the whole egg, then the yolks into the cornstarch mixture. Pour 1/3 of boiling milk into the egg mixture, whisking constantly so that the eggs do not begin to cook.

Return the remaining milk to boil. Pour in the hot egg mixture in a stream, continuing whisking.

Continue whisking (this is important – you do not want the eggs to solidify/cook) until the cream thickens and comes to a boil. Remove from heat and beat in the butter and vanilla.

Pour cream into a stainless steel/ceramic bowl. Press plastic wrap firmly against the surface. Chill immediately and until ready to use.

For Chocolate Pastry Cream (Half Batch Recipe):
Bring ¼ cup (about 50 cl.) milk to a boil in a small pan; remove from heat and add in 3 ounces (about 80 g.) semisweet chocolate, finely chopped, and mix until smooth. Whisk into pastry cream when you add the butter and vanilla.

For Coffee Pastry Cream (Half Batch recipe)
Dissolve 1 ½ teaspoons instant espresso powder in 1 ½ teaspoons boiling water. Whisk into pastry cream with butter and vanilla.

Pate a Choux (Yield: About 28)
¾ cup (175 ml.) water
6 Tbsp. (85 g.) unsalted butter
¼ Tsp. salt
1 Tbsp. sugar
1 cup (125 g.) all-purpose flour
4 large eggs

For Egg Wash:
1 egg and pinch of salt

Pre-heat oven to 425◦F/220◦C degrees. Line two baking sheets with parchment paper.

Preparing batter:
Combine water, butter, salt and sugar in a saucepan over medium heat. Bring to a boil and stir occasionally. At boil, remove from heat and sift in the flour, stirring to combine completely.

Return to heat and cook, stirring constantly until the batter dries slightly and begins to pull away from the sides of the pan.

Transfer to a bowl and stir with a wooden spoon 1 minute to cool slightly.

Add 1 egg. The batter will appear loose and shiny.

As you stir, the batter will become dry-looking like lightly buttered mashed potatoes.

It is at this point that you will add in the next egg. Repeat until you have incorporated all the eggs.

Piping:
Transfer batter to a pastry bag fitted with a large open tip (I piped directly from the bag opening without a tip). Pipe choux about 1 inch-part in the baking sheets. Choux should be about 1 inch high about 1 inch wide.

Using a clean finger dipped in hot water, gently press down on any tips that have formed on the top of choux when piping. You want them to retain their ball shape, but be smoothly curved on top. Brush tops with egg wash (1 egg lightly beaten with pinch of salt).

Baking:
Bake the choux at 425◦F/220◦C degrees until well-puffed and turning lightly golden in color, about 10 minutes.

Lower the temperature to 350◦F/180◦C degrees and continue baking until well-colored and dry, about 20 minutes more. Remove to a rack and cool.

Can be stored in a airtight box overnight.

Filling:
When you are ready to assemble your piece montée, using a plain pastry tip, pierce the bottom of each choux. Fill the choux with pastry cream using either the same tip or a star tip, and place on a paper-lined sheet. Choux can be refrigerated briefly at this point while you make your glaze.

Use one of these to top your choux and assemble your piece montée.

Chocolate Glaze:
8 ounces/200 g. finely chopped chocolate (use the finest quality you can afford as the taste will be quite pronounced; I recommend semi-sweet)

Melt chocolate in microwave or double boiler. Stir at regular intervals to avoid burning. Use the best quality chocolate you can afford. Use immediately.

Hard Caramel Glaze:
1 cup (225 g.) sugar
½ teaspoon lemon juice

Combine sugar and lemon juice in a saucepan with a metal kitchen spoon stirring until the sugar resembles wet sand. Place on medium heat; heat without stirring until sugar starts to melt around the sides of the pan and the center begins to smoke. Begin to stir sugar. Continue heating, stirring occasionally until the sugar is a clear, amber color. Remove from heat immediately; place bottom of pan in ice water to stop the cooking. Use immediately.

Assembly of your Piece Montée:
You may want to lay out your unfilled, unglazed choux in a practice design to get a feel for how to assemble the final dessert. For example, if making a conical shape, trace a circle (no bigger than 8 inches) on a piece of parchment to use as a pattern. Then take some of the larger choux and assemble them in the circle for the bottom layer. Practice seeing which pieces fit together best.

Once you are ready to assemble your piece montée, dip the top of each choux in your glaze (careful it may be still hot!), and start assembling on your cake board/plate/sheet. Continue dipping and adding choux in levels using the glaze to hold them together as you build up.
When you have finished the design of your piece montée, you may drizzle with remaining glaze or use ribbons, sugar cookie cut-outs, almonds, flowers, etc. to decorate. Have fun and enjoy! Bon appétit!

Enjoy With Love,
Christina

Friday, May 14, 2010

Daring Cooks: Stacked Green Chile & Grilled Chicken Enchilada (May 2010)

Our hosts this month, Barbara of Barbara Bakes and Bunnee of Anna+Food have chosen a delicious Stacked Green Chile & Grilled Chicken Enchilada recipe in celebration of Cinco de Mayo! The recipe, featuring a homemade enchilada sauce was found on www.finecooking.com and written by Robb Walsh.

Ahhh, stacked enchilada....My mom used to make us a version of this dish often growing up. Sure, mom's was a bit more simple and easy to assemble, but she was serving to kids! I have fond memories of mom's stacked enchiladas so I was eager to try this recipe and see if it could come close to the version mom used to make.

First, a word of caution about this recipe...one learned from expereince. Buy your chiles and tomatillos as close to the time you'll use them as possible. They go south (ie. bad!) pretty fast. I had to re-purchase both TWICE! UGH...not fun, and certainly added to the expense of this rather inexpensive meal.

Roasting the chiles was fairly easy. Since I do not have a gas oven nor a barbeque of any sorts (remember, I use the George Foreman Grill!), I chose to roast them under the broiler. After I got the peppers covered in oil I popped them in the oven. They popped and sputtered and charred up nicely. I turned them a few times and made sure they were soft. I had the bowl with plastic wrap ready so that they could (essentially) steam away while they cooled. They were all done at different times, so it was a bit laborious because I had to keep checking on them (not a put it in and walk-away type activity).

Once the chiles were roasting, I decided to start the tomatillos. I boiled mine for about 10-12 minutes until they split and looked soft. Again, they weren't all done at the same time so I just stirred and dunked as needed until they were all done. I transferred them directly to the food processor when they were done and then gave them a quick whirl.

The chiles cooled enough that I could work with them by the time the tomatillos were done. I made quick work of taking off the skin and removing the seeds. Instead of mincing them like suggested, I just popped them into the same food processor and gave them a whirl....minced...super fine! HA!

The sauce never really did thicken up for me...but I figured it was probably something I had done wrong and just kept going...hoping it would still taste good and possibly thicken once in the oven.

I moved on to the chicken. I used my grill pan and seasoned the chicken with McCormick's Grill Mates Mesquite Seasoning. I shred it once it had rested for a bit and then got on with the tortillas and stacking process.

My mom used to pour a bit of oil into a small pan and basically dunk the tortillas in the hot oil, flip and then remove to paper towels. I used the same process since it seemed odd to have to keep adding oil to the pan.

Once I had the tortillas done, I started stacking on a cookie sheet. This step seemed unnecessary to me at first. All the ingredients were cooked, why bother baking?! But, in the spirit of the challenge, I went with it. I could have used a bit more of the sauce on the bottom of the pan (my finished product stuck a bit). I also LOVE cheese, so could have used more of that too. I got them all assembled and popped it into the oven.

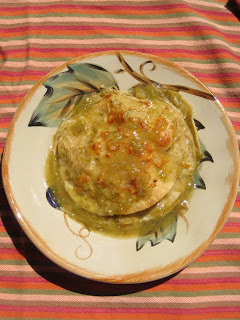
When it came out, I must say that it looked really good. I was excited to try it and dig into what would now be lunch. After taking the glamour shots (below), I dug in. They were good! I could have used a bit more heat (spice), but I know that it's a personal preference and I didn't add any hot sauce during the process (worried it would turn out TOO spicy). Would I make this again...I may, but I must admit...mom's was still tastier for me, and much easier. I'll post both recipes, you decide.

Stacked Green Chile & Grilled Chicken Enchilada


The Recipe: Stacked Green Chile & Grilled Chicken Enchilada
Ingredients
1½ pounds Fresh Anaheim chiles (about eight 6 to 8 inch chiles) 24 ounces 678 grams - roast, peel, remove seeds, chop coarsely. Other green chiles (NOT bell peppers) could probably be substituted but be conscious of heat and size!)
7-8 ounces Tomatillos (about 4-5 medium)212 grams - peel, remove stems
4 cups Chicken broth (32 ounces/920 grams)
1 clove Garlic, minced
2 teaspoons yellow onion, minced
1 teaspoon dried oregano
½ tsp Kosher salt (add more to taste)
¼ tsp Black Pepper (add more to taste)
2 tablespoons Cornstarch (dissolve in 2 tablespoons water, for thickening)
Hot sauce, your favorite, optional
2 Boneless chicken breasts (you can also use bone-in chicken breasts or thighs)
3 tablespoons Olive oil or other neutral vegetable oil (use more as needed)
Kosher salt and pepper
12 Small Corn tortillas (5-6 inch/13-15 cm). (you can also use wheat tortillas or other wraps)
6 ounces grated Monterey Jack, 170 grams (other cheeses (cheddar, pepper jack, Mexican cheeses) can be used. Just be sure they melt well and complement the filling)
Cilantro for garnish, chopped and sprinkled optional

Directions:

Roasting Fresh Chiles
1. Coat each chile with a little vegetable oil. If you are doing only a couple chiles, using the gas stove works. For larger batches (as in this recipe), grilling or broiling is faster.

2. Lay the oiled chiles on the grill or baking sheet (line pan with foil for simpler clean-up). Place the grill or broil close to the element, turning the chiles so they char evenly. They should be black and blistered.

3. As they are completely charred (they will probably not all be done at once), remove them to a bowl and cover with plastic, or close up in a paper bag. Let them rest until they are cool.

4. Pull on the stem and the seed core MAY pop out (it rarely does for me). Open the chile and remove the seeds. Turn the chile skin side up and with a paring knife, scrape away the skin. Sometimes it just pulls right off, sometimes you really have to scrape it.

5. DO NOT RINSE!

Green Chile Sauce
1. Put a medium saucepan of water on to boil and remove the papery outer skin from the tomatillos. Boil the tomatillos until soft, 5 to 10 minutes. You can also grill the tomatillos until soft.

2. Drain and puree in a blender or food processor.

3. Return the tomatillos to the saucepan along with the chicken broth, chopped green chiles, minced onion, oregano, garlic, salt and pepper.

4. Bring to a boil over medium-high heat and then reduce the heat and simmer for 10 minutes.

5. Add the cornstarch/water mixture and stir well. Simmer, stirring occasionally, until the sauce is thickened and reduced to 4-5 cups, another 10-15 minutes.

6. Adjust seasonings and add hot sauce if you want a little more heat.

Stacked Green Chile and Grilled Chicken Enchiladas
1. Heat a gas grill to medium high or build a medium-hot charcoal Coat the chicken with olive oil and season well with salt and pepper. Preheat oven to 450 degrees.

2. Grill the chicken until just cooked through, 4-5 minutes a side for boneless chicken breasts.

3. Cool and then slice into thin strips or shred.

4. In a small skillet, heat 3 tablespoons oil over medium-high heat until very hot. Dip the edge of a tortilla into the oil to check – it should sizzle immediately.

5. Using tongs, put a tortilla into the pan and cook until soft and lightly brown on each side, about 15-20 seconds per side (at the most).

6. Drain on paper towels.

7. Add oil as needed and continue until all 12 tortillas are done.

8. In a baking dish large enough to hold four separate stacks of tortillas, ladle a thin layer of sauce.

9. Lay four tortillas in the dish and ladle another ½ cup (4 ounces/112 grams) of sauce over the tortillas.

10. Divide half the chicken among the first layer of tortillas, top with another ½ cup of sauce and 1/3 of the grated cheese.

11. Stack another four tortillas, top with the rest of the chicken, more sauce and another third of the cheese.

12. Finish with the third tortilla, topped with the remaining sauce and cheese.

13. Bake until the sauce has thickened and the cheese melted, about 20 minutes. Let rest for 5-10 minutes.

14. To serve, transfer each stack to a plate. Spoon any leftover sauce over the stacks and sprinkle with cilantro, if you wish. The stacks may also be cooked in individual gratin dishes.

Mom's Stacked Beef Enchiladas
Ingredients
1 lb hamburger meat
1 packet taco seasoning
1 can red enchilada sauce
Corn tortillas
Vegetable oil (or similar, neutral flavored oil)
Refried beans

Toppings:
Cheese, shredded (Mom normally used mild cheddar)
Lettuce, shredded
Tomatoes, chopped
Onions, chopped finely
Sour Cream
Other toppings of your choice such as jalepenos or hot sauce.

Directions:
Brown the hamburger meat, drain. Add taco seasoning mix (dry) and mix well.
Heat the enchilada sauce in a shallow skillet. Heat the refried beans in a bowl/pan.
Heat the oil over medium-high heat until very hot. Dip the edge of a tortilla into the oil to check – it should sizzle immediately.
Working quickly, Using tongs, put a tortilla into the pan of oil and cook until soft and lightly brown on each side, about 15-20 seconds per side (at the most). Immediately transfer to the enchildada sauce, coat with sauce. Once coated, place on the plate you will serve the enchilada on. Smear the base tortilla with a dollop of refried beans and sprinkle with a spoonful of meat. Repeat with an additonal tortilla in the sauce, place on top of bean and meat layer. Top with another layer of beans, meat and once final top tortilla coated in sauce. On top of the stack, add whatever toppings you prefer. Cheese will melt best if added first, then the lettuce, tomatoes, onions, sour cream, etc. Enjoy!

Note: Mom would make them one at a time letting each person help with the layers and adding their own toppings to their liking. You can make as many or as few layers of bean/meat as you want.

Enjoy with Love,
Christina