Showing posts with label Daring Bakers. Show all posts

Monday, September 27, 2010

Daring Bakers: Sugar Cookies (September 2010)

The September 2010 Daring Bakers’ challenge was hosted by Mandy of “What the Fruitcake?!” Mandy challenged everyone to make Decorated Sugar Cookies based on recipes from Peggy Porschen and The Joy of Baking.

Sugar cookies are a long-standing tradition in our family. I have fond memories of the sweet treats from my childhood. In fact, we have a “secret family recipe” that has been passed on throughout the years (nope, I’m not sharing that one on the internet!). When I saw that the challenge this month was sugar cookies, I was happy (knowing it wouldn’t be much of a challenge) but also a bit disappointed (knowing I wouldn’t learn a whole lot).

The good news is that a friend asked me to bake and decorate sugar cookies as baby shower favors for her sister. Her sister is having twins soon so the theme was Noah’s Ark. I thought I would try something new and order pressed sugar decorations from SugarCraft to use on a standard cookie shape. This was I could make a bunch of them quickly and still have them be adorable. She also asked me to make and decorate a sheet cake with the design of the invitation on the cake (and there was my challenge for the month!).

I used my family recipe for the cookies and a royal icing recipe I knew and trusted (since that’s what my friend had tasted and wanted). The whole process is fairly straight forward. My best tip is to use multiple pans for baking. I use two with Silpats, and can basically be baking from start to finish with no breaks since they only take about 8-10 minutes per batch. That’s about the same amount of time it takes to roll, cut and get the next batch ready.

So…the pressed sugar decorations arrived (amazingly intact) and were super cute (I thought!). Here’s a glamor shot of the cookies and then how I wrapped them to be favors.
 

Here are a few other cookies that I’ve done over the years…I think I’m getting better! What do you think:
Oh, and for those that are wondering…here’s how the sheet cake turned out.

 
It turned into a major undertaking, but was worth it in the end. I’m told the mom-to-be was quite happy with both the cake and the cookies. I’m so glad to be a very small part of this important event in her growing family’s life. 

To see how the other Daring Bakers did with this challenge, head over here. They made some amazing cookies!!

And one last thing…if you want to order cookies, a cake or other dessert from me, just let me know!

The Daring Bakers Recipe (Because I can’t give away the family recipe!)
Basic Sugar Cookies
Makes Approximately 36x 10cm / 4" Cookies
200g / 7oz / ½ cup + 6 Tbsp Unsalted Butter, at room temperature
400g / 14oz / 3 cups + 3 Tbsp All Purpose / Plain Flour
200g / 7oz / 1 cup Caster Sugar / Superfine Sugar
1 Large Egg, lightly beaten
5ml / 1 tsp Vanilla Extract / Or seeds from 1 vanilla bean

Directions
  • Cream together the butter, sugar and any flavourings you’re using. Beat until just becoming creamy in texture.
  • Beat in the egg until well combined, make sure to scrape down the sides of the bowl.
  • Add the sifted flour and mix on low until a non sticky dough forms.
  • Knead into a ball and divide into 2 or 3 pieces.
  • Roll out each portion between parchment paper to a thickness of about 5mm/1/5 inch (0.2 inch).
  • Refrigerate for a minimum of 30mins.
  • Once chilled, peel off parchment and place dough on a lightly floured surface.
  • Cut out shapes with cookie cutters or a sharp knife.
  • Arrange shapes on parchment lined baking sheets and refrigerate for another 30mins to an hour.
  • Re-roll scraps and follow the above process until all scraps are used up.
  • Preheat oven to 180°C (160°C Fan Assisted) / 350°F / Gas Mark 4.
  • Bake until golden around the edges, about 8-15mins depending on the size of the cookies.
  • Leave to cool on cooling racks.
  • Once completely cooled, decorate as desired.

Royal Icing
You can find the Royal Icing Recipe I use by clicking here. Just add a bit more water to the recipe for flooding.

Daring Baker’s Royal Icing
315g – 375g / 11oz – 13oz / 2½ - 3 cups Icing / Confectioner’s / Powdered Sugar, unsifted
2 Large Egg Whites
10ml / 2 tsp Lemon Juice
5ml / 1 tsp Almond Extract, optional
  • Tip: 2 amounts of icing suga are listed, the lesser amount is good for a flooding consistency, and the larger amount is for outlining, but you can add even more for a much thicker consistency good for writing. If you add too much icing sugar or would like to make a thinner consistency, add very small amounts of water, a few drops at a time, until you reach the consistency you need.
Directions
  • Beat egg whites with lemon juice until combined.
  • Sift the icing sugar to remove lumps and add it to the egg whites.
  • Add very small amounts of water, a few drops at a time, until you reach the consistency you need.
  • Beat on low until combined and smooth.
  • Use immediately or keep in an airtight container.
  • Tip: Royal Icing starts to harden as soon as it’s in contact with air so make sure to cover containers with plastic wrap or moist paper towel while not in use.
Decorating Your Cookies: Flooding
"Flooding” a cookie is a technique used when covering a cookie with Royal Icing.

1. You outline the area you want to flood which helps create a dam.
2. Then fill or flood inside the area you’ve outlined.

Decorating Your Cookies: What You'll Need
  • Piping bags / Parchment Cones / Ziplock Bags
  • Elastic bands
  • Piping tips (between sizes 1 & 5)
  • Couplers
  • Glasses (handy for standing your piping bags in)
  • Clean clothes, dry & damp
  • Toothpicks
  • Gel or paste food colouring 
Decorating your cookies: Royal Icing
The most important thing when it comes to decorating with Royal Icing is the consistency.

There are two ways of flooding your cookies. Some like to do the outline with a thicker icing and then flood with a thinner icing. Some like to use the same icing to do both which saves time and you don’t have to have two different piping bags for each colour you’re using.

The Same Consistency Method:
  • Mix your royal icing according to the recipe/instructions.
  • Drag a knife through the surface of the Royal Icing and count to 10.
  • If the surface becomes smooth between 5 & 10 seconds, the icing is at the correct consistency.
  • Tip: If your icing is too thick, thin it by adding a few drops of water. Mix, do the 10 second test, then if it’s still too thick, add a few more drops of water, repeat, etc.
  • Tip: To thicken your icing, add small amounts of icing sugar until thick enough for the 10 second test.
Two Different Consistencies Method:
  • Mix your royal icing according to the recipe/instructions.
  • Separate into 2 different bowls, one lot of icing for outlining, the other for flooding.
  • For the outlining icing, drag a knife through the surface of the Royal Icing.
  • If the surface becomes smooth at around 10 seconds, the icing is at the correct consistency.
  • Tip: If your icing is too thick, thin it by adding a few drops of water. Mix, count to 10 seconds, then if it’s still too thick, add a few more drops of water, repeat, etc.
  • Tip: To thicken your icing, add small amounts of icing sugar until thick enough for the 10 second test.
  • For the flooding/filling icing, drag a knife through the surface of the Royal Icing. 
  • If the surface becomes smooth at around 3-4 seconds, the icing is at the correct consistency. 
  • Tip: If your icing is too thick, thin it by adding a few drops of water. Mix, count to 3-4 seconds, then if it’s still too thick, add a few more drops of water, repeat, etc.
  • Tip: To thicken your icing, add small amounts of icing sugar until thick enough for the 3-4 second test. 
Colouring:
  • Separate Royal Icing into separate bowls for each colour you plan on using.
  • Tip: Make sure to cover the bowls with cling film or a damp cloth to prevent the top from setting and then making lumps. 
  • Using a toothpick, add gel or paste colouring to each bowl and mix thoroughly until desired colour is reached. 
  • Tip: You can use liquid food colouring but you might not be able to get the desired strength of colour, liquid colouring will also thin out the icing so you’ll need to add more icing sugar to thicken it again.
Prepping and filling your piping bags:
  • Attach your icing tips to the piping bags using couplers.
  • Tip: You don’t need to use a coupler but it makes it easier if you want to change tip sizes
  • Tip: A size 1 tip is best for doing intricate details. A size 2 tip is good for some details and outlining. Fill or flood with sizes 2 – 5.
  • Tip: You don’t need a piping bag, you can use a ziplock bag with a tiny bit snipped off the corner. I would however recommend getting a piping set if you don’t have one as it will be much easier and more precise.
  • Stand the piping bags in glasses with the tops of the bags folded over the top of the glass.
  • Fill your icing bags with each coloured icing.
  • Tie the ends of the piping bags with elastic bands.
Decorating: Outlining
  • Fit the piping bag with a size 2 or 3 tip.
  • Tip: Or snip a very small bit of the corner off of a Ziploc bag
  • Hold the piping bag at a 45 degree angle above the cookie where you want to start the outline.
  • Gently squeeze the piping bag and start moving in the direction you want to outline the cookie.
  • Start lifting the piping bag away from the cookie so that the flow of icing falls onto the cookie, making it an even and neater outline.
  • As you start to reach the beginning of the outline, bring the piping tip closer to the surface of the cookie to meet the start of the icing outline.
  • Tip: If you’re doing an intricate cookie, like a snow flake, you won’t be able to lift the tip as far away from the cookie.
  • If you’re doing a different colour border, eg. a black border, let the outline dry before flooding. If using the same colour for the outline as you are flooding with, begin flooding after doing the outline.
Decorating: Flooding
  • Fit the piping bag with a size 2-5 tip, the bigger the area being filled, the bigger the tip.
  • Tip: Or cut slightly more off the corner of a Ziploc bag to create a slightly larger opening.
  • Quickly zigzag back and forth over the area you want to fill.
  • Tip: You need to be quick when flooding the cookie so don’t worry too much if it’s not filled in neatly.
  • Using a toothpick or clean paintbrush, push the icing around into the gaps that are still remaining.
  • Either pick up the cookie and tip it from side to side to even out the filling, or lightly bang the cookie down on your kitchen counter.  
Decorating: Melding colours
  • If you would like to add lines or dots to the base colour that you flooded the cookie with so that they meld and dry as a smooth surface, you need to add the lines/dots/patterns as quickly as possible after flooding and smoothing the surface of the cookie.
  • Tip: Make sure to have all the colours you’re planning on using ready and close by so that you can switch between colours quickly 
  • Simply pipe other colours onto the flooded surface in patterns or lines which you can either leave as that or then drag a toothpick through to make marbling patterns. 
Decorating: On top of flooding
  • If you’d like to do other patterns/outlines or writing on top of the flooded surface so that they are raised above the flooded background, simply allow the icing to dry, preferably over night.
  • Fit the piping bag with tip sizes 1-3. 
  • Pipe patterns or write on top of the dry icing.
  • Tip: For writing, the consistency of your icing should be thicker rather than thinner, drag a knife through your icing and when the surface smoothes around 12-15 seconds, the consistency is correct. 
Packaging and Storing:
  • Once fully decorated, allow cookies to dry for 24 hours in a cool and dry area.  
  • Stack cookies in an airtight container, from largest cookies at the bottom, to smallest and more intricate at the top, with parchment or wax free paper in between the layers.
  • Store in a cool and dry area with the container’s lid firmly sealed.
  • Will last for about a month if stored this way.
Enjoy With Love,
Christina

Exciting News!!

The gals at The Daring Kitchen asked for some of us Daring Bakers/Daring Cooks to contribute towards the weekly Food Talk article. I stepped up to the plate and....

This is my week!

Go check it out! The article is titled: Cooking Together With Aphrodisiacs!

Thanks for the opportunity ladies!

Enjoy With Love,
Christina

Friday, August 27, 2010

Daring Bakers: Baked Alaska and or Ice Cream Petit Fours (August 2010)...Not Really...(But Look...It's Butterfinger Ice Cream)

The August 2010 Daring Bakers’ challenge was hosted by Elissa of 17 and Baking. For the first time, The Daring Bakers partnered with Sugar High Fridays for a co-event and Elissa was the gracious hostess of both. Using the theme of beurre noisette, or browned butter, Elissa chose to challenge Daring Bakers to make a pound cake to be used in either a Baked Alaska or in Ice Cream Petit Fours. The sources for Elissa’s challenge were Gourmet magazine and David Lebovitz’s “The Perfect Scoop.”

I was so excited about this challenge. I'd always wanted to try my hand at brown butter, baked Alaska and petit fours! Alas, I failed....I didn't allow enough time in my schedule to complete this challenge. I did make the ice cream part needed, so I'll share that recipe with you along with what should have been an awesome challenge recipe. Maybe one day when I have a bit more free time (oye!), I'll attempt this challenge.

I made Butterfinger Ice Cream. It's a basic vanilla ice cream with chopped Butterfingers in it. Yumm....it's so good...

The Recipe:
Butterfinger Ice Cream
Adapted from Kitchen Aid's French Vanilla Ice Cream
2 1/2 cups (590 ml) half-and-half
8 egg yolks
1 cup (235 ml) sugar
2 1/2 cups (590 ml) whipping cream
4 teaspoons (20 ml) vanilla
1/8 teaspoon (.5 ml) salt
2-3 Butterfinger candy bars, chopped

In medium saucepan over medium heat, heat half-and-half until very hot but not boiling, stirring often. Remove from heat; set aside.

Place egg yolks and sugar in mixer bowl. Whip using a whisk attachment. Mix about 30 seconds, or until well blended and slightly thickened. Continuing, very gradually add half-and-half; mix until blended. Return half-and-half mixture to medium saucepan; cook over medium heat until small bubbles form around edge and mixture is steamy, stirring constantly. Do not boil. Transfer half-and-half mixture into large bowl; stir in whipping cream, vanilla, and salt. Cover and chill thoroughly, at least 8 hours.

Using a container with a spout, pour mixture into your prepared ice cream maker. Churn until desired consistency. Add in chopped Butterfinger candy during last 2-3 minutes of churning. Immediately transfer ice cream into serving dishes (soft serve consistency), or freeze in an airtight container.

Enjoy With Love,
Christina

PS...Here are the challenge recipes in case YOU want to give them a try. You can also visit The Daring Kitchen for more information and to see this challenge as completed by others.

Vanilla Ice Cream
1 cup (250ml) whole milk
A pinch of salt
3/4 cup (165g) sugar
1 vanilla bean, split lengthwise OR 2 teaspoons (10ml) pure vanilla extract
2 cups (500ml) heavy (approx 35% butterfat) cream
5 large egg yolks
1 teaspoon (5ml) pure vanilla extract

1. Heat the milk, salt, and sugar in a medium saucepan until the liquid steams. Scrape out the seeds of the vanilla bean with a paring knife and add to the milk, along with the bean pod. Cover, remove from heat, and let infuse for an hour. (If you do not have a vanilla bean, simply heat the milk, salt, and sugar in a medium saucepan until the liquid steams, then let cool to room temperature.)

2. Set up an ice bath by placing a 2-quart (2 litre) bowl inside a large bowl partially filled with water and ice. Put a strainer on top of the smaller bowl and pour in the cream.

3. In another bowl, lightly beat the egg yolks together. Reheat the milk in the medium saucepan until warmed, and then gradually pour ¼ cup warmed milk into the yolks, constantly whisking to keep the eggs from scrambling. Once the yolks are warmed, scrape the yolk and milk mixture back into the saucepan of warmed milk and cook over low heat. Stir constantly and scrape the bottom with a spatula until the mixture thickens into a custard which thinly coats the back of the spatula.

4. Strain the custard into the heavy cream and stir the mixture until cooled. Add the vanilla extract (1 teaspoon [5ml] if you are using a vanilla bean; 3 teaspoons [15ml] if you are not using a vanilla bean) and refrigerate until thoroughly chilled, preferably overnight.

5. Remove the vanilla bean and freeze in an ice cream maker. If you don’t have an ice cream maker, you can make it without a machine. See instructions from David Lebovitz: http://www.davidlebovitz.com/archives/2007/07/making_ice_crea_1.html
 
Brown Butter Pound Cake
19 tablespoons (9.5 oz) (275g) unsalted (sweet) butter
2 cups (200g) sifted cake flour (not self-rising; sift before measuring)
1 teaspoon (5g) baking powder
1/2 teaspoon (3g) salt
1/2 cup (110g) packed light brown sugar
1/3 (75g) cup granulated sugar
4 large eggs
1/2 teaspoon pure vanilla extract

1. Preheat the oven to 325°F/160°C and put a rack in the center. Butter and flour a 9”x9” (23cmx23cm) square pan.

2. Place the butter in a 10” (25cm) skillet over medium heat. Brown the butter until the milk solids are a dark chocolate brown and the butter smells nutty. (Don’t take your eyes off the butter in case it burns.) Pour into a shallow bowl and chill in the freezer until just congealed, 15-30 minutes.

3. Whisk together cake flour, baking powder, and salt.

4. Beat the brown butter, light brown sugar, and granulated sugar in an electric mixer until light and fluffy, about 2 minutes. Beat in the eggs one at a time, mixing well, and then the vanilla extract.

5. Stir in the flour mixture at low speed until just combined.

6. Scrape the batter into the greased and floured 9”x9” (23cmx23cm) square pan. Smooth the top with a rubber spatula and rap the pan on the counter. Bake until golden brown on top and when a toothpick inserted into the center comes out clean, about 25 minutes.

7. Cool in the pan 10 minutes. Run a knife along the edge and invert right-side-up onto a cooling rack to cool completely.

Chocolate Glaze (For the Ice Cream Petit Fours)
9 ounces (250g) dark chocolate, finely chopped
1 cup (250 ml) heavy (approx 35% butterfat) cream
1 1/2 tablespoons (32g) light corn syrup, Golden syrup, or agave nectar
2 teaspoons (10ml) vanilla extract

Stir the heavy cream and light corn syrup in a small saucepan over medium heat until it comes to a boil. Remove from heat and add the dark chocolate. Let sit 30 seconds, then stir to completely melt the chocolate. Stir in the vanilla and let cool until tepid before glazing the petit fours.

Meringue (For the Baked Alaska)
8 large egg whites
½ teaspoon (3g) cream of tartar
½ teaspoon (3g) salt
1 cup (220g) sugar

Beat the egg whites, cream of tartar, and salt on high speed in an electric mixer until soft peaks form. Beat in the sugar gradually in a slow stream until stiff peaks form.

Assembly Instructions – Ice Cream Petit Fours
1. Line a 9”x9” (23cmx23cm) pan with plastic wrap, so that no sides of the pan are exposed and so there is some extra plastic wrap hanging off the sides. Spread 1 ¾ to 2 cups (450ml to 500ml) ice cream into the pan. Cover with more plastic wrap and freeze several hours.

2. Once the brown butter pound cake has completely cooled, level the top with a cake leveler or a serrated knife. Then split the cake in half horizontally to form two thin layers.

3. Unwrap the frozen ice cream. Flip out onto one of the layers of cake and top with the second layer of cake. Wrap well in plastic wrap and return to the freezer overnight.

4. Make the chocolate glaze (see above.)

5. While the glaze cools, trim ¾” (2cm) off each side of the ice cream cake to leave a perfectly square 7.5” (19cm) ice cream cake. Cut the cake into twenty five petit fours, each 1.5”x1.5” (4cmx4cm).

6. Glaze the petit fours one at a time: place a petit four on a fork and spoon chocolate glaze over it.

7. Place the petit fours on a parchment-lined baking sheet and return to the freezer for one hour.

Assembly Instructions – Baked Alaska
1. Line four 4” (10cm) diameter tea cups with plastic wrap, so that plastic wrap covers all the sides and hangs over the edge. Fill to the top with ice cream. Cover the top with the overhanging plastic wrap and freeze for several hours, or until solid.

2. Level the top of the brown butter pound cake with a serrated knife or with a cake leveler. Cut out four 4” (10cm) diameter circles from the cake. Discard the scraps or use for another purpose.

3. Make the meringue (see above.)

4. Unwrap the ice cream “cups” and invert on top of a cake round. Trim any extra cake if necessary.

5. Pipe the meringue over the ice cream and cake, or smooth it over with a spatula, so that none of the ice cream or cake is exposed. Freeze for one hour or up to a day.

6. Burn the tips of the meringue with a cooking blow torch. Or, bake the meringue-topped Baked Alaska on a rimmed baking sheet in a 500°F/260°C oven for 5 minutes until lightly golden. Serve immediately.

Tuesday, July 27, 2010

Daring Bakers: Swiss Swirl Ice Cream Cake (August 2010)

The July 2010 Daring Bakers’ challenge was hosted by Sunita of Sunita’s world – life and food. Sunita challenged everyone to make an ice-cream filled Swiss roll that’s then used to make a bombe with hot fudge. Her recipe is based on an ice cream cake recipe from Taste of Home.

I apologize in advance, this blog post will be short…lots going on this summer!

This recipe seemed like a fun one to try to beat the dog days of summer. It took a bit of planning ahead because of the two different types of ice creams. I’ve made lots of ice creams before so the hardest part on those was deciding what flavors to use. I finally settled on Butter Pecan and Pistachio. Both were yummy on their own, though the butter pecan’s texture was a bit icier than I’d had liked and the pistachio had a bit of an odd aftertaste (maybe just me?!). Both worked well for the end product though.

The part that had me the most nervous were the swiss rolls. I was nervous because I have such lousy luck with “rolls.” I’ve tried pumpkin rolls and buche de noel (those fun chocolate logs at Christmas) with little to no success. I’m not sure what I do wrong, but I think it may have something to do with the towel or cooling process (any tips?!).

This cake “roll” was not much different except that I pressed on. I followed the recipe to the letter, even went out and purchased the exact size pan recommended. My cakes first stuck a bit to the pan (ok, so I did forget to use parchment), then when I unrolled them they cracked like they always do…:::SIGH::: Like I said though, I pressed on and filled them with the whipped cream anyway (which, is divine!! USE THE FULL VANILLA BEAN!).

I decided that the best way to cut things from the freezer (the frozen swiss rolls, end product) is with an electric knife….such clean, quick work! :-) The assembly was easy, though a bit time consuming (waiting for each step to freeze before moving to the next). So again, plan ahead.

Overall, this recipe was a challenge (the rolls still beat me I feel), but it was a fun way to have an ice cream cake. Personally, I think I’d use the store bought stuff in a pinch…Little Debbie does a wonderful roll and some of those store bought ice creams are great…though my homemade ones are pretty good too.

To see other Daring Bakers' creations and get a downloadable PDF of the recipes, visit: The Daring Kitchen
Enjoy!

The Glamour Shot!

Swiss Roll Ice Cream Cake
(Inspired by the recipe of the same name from the Taste of Home website)
The Swiss Rolls:
Preparation time: 10 minutes
Baking time: 10 - 12 minutes
Rolling and cooling time: at least 30 minutes
Filling: 5 - 8 minutes
Filling and rolling: 5 - 10 minutes

Ingredients:
6 medium sized eggs
1 C / 225 grams caster sugar /8 oz + extra for rolling
6 TBS. / 45 grams/ a pinch over 1.5 oz of all purpose (plain) flour + 5 TBS. /40 gram / a pinch under 1.5 oz of natural unsweetened cocoa powder, sifted together
2 TBS. /30 ml / 1 fl oz of boiling water
a little oil for brushing the pans

For the filling:
2 C / 500 mls/ 16 fl oz of whipping cream
1 vanilla pod, cut into small pieces of about ½ cm (or 1 tsp vanilla extract)
5 TBS. / 70 grams / 2.5oz of caster sugar

Directions:
Pre-heat the oven at 200 deg C /400 deg F approximately. Brush the baking pans (11 inches by 9 inches) with a little oil and line with greaseproof baking paper. If you have just one pan, bake one cake and then let the pan cool completely before using it for the next cake.

In a large mixing bowl, add the eggs and sugar and beat till very thick; when the beaters are lifted, it should leave a trail on the surface for at least 10 seconds.

Add the flour mixture, in three batches and fold in gently with a spatula. Fold in the water.

Divide the mixture among the two baking pans and spread it out evenly, into the corners of the pans.

Place a pan in the center of the pre-heated oven and bake for about 10-12 minutes or till the center is springy to the touch.

Spread a kitchen towel on the counter and sprinkle a little caster sugar over it.

Turn the cake on to the towel and peel away the baking paper. Trim any crisp edges.

Starting from one of the shorter sides, start to make a roll with the towel going inside. Cool the wrapped roll on a rack, seam side down.

Repeat the same for the next cake as well.

Grind together the vanilla pieces and sugar in a food processer till nicely mixed together. If you are using vanilla extract, just grind the sugar on its own and then add the sugar and extract to the cream.

In a large bowl, add the cream and vanilla-sugar mixture and beat till very thick.

Divide the cream mixture between the completely cooled cakes.

Open the rolls and spread the cream mixture, making sure it does not go right to the edges (a border of ½ an inch should be fine).

Roll the cakes up again, this time without the towel. Wrap in plastic wrap and chill in the fridge till needed, seam side down.


Vanilla Ice Cream
Preparation time: 5 minutes + freezing

Ingredients
2 and ½ C / 625 ml / 20 fl oz of whipping cream
1 vanilla bean, minced or 1 tsp/ 5 ml/ .15 fl oz vanilla extract
½ C / 115grams/ 4 oz of granulated sugar

Directions:
Grind together the sugar and vanilla in a food processor. In a mixing bowl, add the cream and vanilla –sugar mixture and whisk lightly till everything is mixed together. If you are using the vanilla extract, grind the sugar on its own and then and the sugar along with the vanilla extract to the cream.

Pour into a freezer friendly container and freeze till firm around the edges. Remove from the freezer, beat till smooth and return to the freezer. Do this 3-4 times and then set completely.


Hot Fudge Sauce
Preparation time: 2 minutes
Cooking time: 2 minutes

Ingredients:
1 C / 230 grams / 8 oz of caster sugar
3 TBS. / 24 grams /1.5 oz of natural unsweetened cocoa powder
2 TBS. /15 grams / 1 oz of corn flour/cornstarch
1 ½ C / 355 ml /12 fl oz of water
1 TBS. /14 grams/ 1 oz butter
1 tsp/ 5 ml / .15 fl oz vanilla extract

Directions:
In a small saucepan, whisk together the sugar, cocoa powder, corn flour and water.

Place the pan over heat, and stir constantly, till it begins to thicken and is smooth (for about 2 minutes).

Remove from heat and mix in the butter and vanilla. Keep aside to cool.


Chocolate Ice Cream
Preparation time: 5 minutes + freezing

Ingredients:
2 C / 500 ml whipping cream
1 C / 230 grams / 8 oz caster sugar
3 TBS. / 24 grams / 1.5 oz of natural unsweetened cocoa powder

Directions:
Grind together the sugar and the cocoa powder in a food processor.

In a saucepan, add all the ingredients and whisk lightly.

Place the pan over heat and keep stirring till it begins to bubble around the edges.

Remove from heat and cool completely before transferring to a freezer friendly container till firm around the edges. If you are using an ice cream maker, churn the ice cream according to the manufacturer’s instruction, after the mixture has cooled completely.

Remove from the freezer, beat till smooth and return to the freezer. Do this 3-4 times and then set completely.


Swiss Roll Ice Cream Cake Assembly:
Cut the Swiss rolls into 20 equal slices (approximately 2 cms each).
Cover the bottom and sides of the bowl in which you are going to set the dessert with cling film/plastic wrap.

Arrange two slices at the bottom of the pan, with their seam sides facing each other. Arrange the Swiss roll slices up the bowl, with the seam sides facing away from the bottom, to cover the sides of the bowl. Cover the bowl with plastic wrap and freeze till the slices are firm (at least 30 minutes).

Soften the vanilla ice cream. Take the bowl out of the freezer, remove the cling film cover and add the ice cream on top of the cake slices. Spread it out to cover the bottom and sides of the bowl. Cover the bowl with plastic wrap and freeze till firm (at least 1 hour).

Add the fudge sauce over the vanilla ice cream, cover and freeze till firm. (at least an hour).

Soften the chocolate ice cream and spread it over the fudge sauce. Cover with plastic wrap and freeze for at least 4-5 hours till completely set.

Remove the plastic cover, and place the serving plate on top of the bowl. Turn it upside down and remove the bowl and the plastic lining. If the bowl does not come away easily, wipe the outsides of the bowl with a kitchen towel dampened with hot water. The bowl will come away easily.

Keep the cake out of the freezer for at least 10 minutes before slicing, depending on how hot your region is. Slice with a sharp knife, dipped in hot water.

Ice Creams I Used (From Foodnetwork.com):

Butter Pecan
Ingredients
1 tablespoon unsalted butter
2/3 cup chopped pecans
1 (13-ounce) can evaporated milk
1 (3 3/4-ounce) package instant French vanilla pudding mix
1 cup sugar
1 teaspoon vanilla extract
3 cups whole milk

Directions
Melt the butter in a small saucepan. Cook the pecans over low heat until they are lightly browned, about 3 minutes. Place on a paper towel to drain and cool. In an 8-cup measuring cup with a spout, combine the remaining ingredients. Whisk until the sugar is dissolved. Pour the mixture into an ice cream maker and freeze according to manufacturers' instructions. Add the pecans 10 minutes into the freezing.


Pistachio Ice Cream
Ingredients
1 cup unsalted shelled pistachios
1 cup sugar
2 cups milk (do not use low-fat or nonfat)
3 cups heavy cream
12 large egg yolks
1/2 teaspoon almond extract

Directions
Finely grind 1 cup of the pistachios and 1/2 cup of the sugar in a food processor, being careful not to turn the mixture into butter. Bring the milk and cream to a boil in heavy large saucepan. Remove from heat.

Combine the egg yolks and remaining 1/2-cup sugar in a mixing bowl and whisk to blend. Gradually whisk 1 cup of the hot milk mixture into the eggs. Gradually add the egg mixture in a slow, steady stream into the hot cream in the saucepan. Cook over low heat, stirring occasionally, until the custard thickens enough to coat the back of a spoon and reaches 170 degrees on an instant-read thermometer, about 6 minutes.

Remove from the heat and strain into a large bowl. Add pistachio mixture and almond extract. Cover with plastic wrap, pressing down against the surface to keep a skin from forming, and chill in the refrigerator for at least 2 hours.

Remove from the refrigerator and pour into the bowl of an ice cream machine. Freeze according to the manufacturer's instructions. After the ice cream is made, transfer to an airtight container and freeze until ready to serve.

Enjoy With Love,
Christina

Thursday, May 27, 2010

Daring Bakers: Piece Montée or Croquembouche (May 2010)

The May 2010 Daring Bakers’ challenge was hosted by Cat of Little Miss Cupcake. Cat challenged everyone to make a piece montée, or croquembouche, based on recipes from Peter Kump’s Baking School in Manhattan and Nick Malgieri.

Ahh...the traditional French wedding cake. Different and delicious. This month's challenge came as a relief in some ways. Since I'd just finished my classes at Cookology where we had made creme puffs, I knew I could ace that part of the challenge. *phew*

So, it was with a bit of an "I've got this one" attitude that I entered the kitchen. Honestly, it wasn't until I realized that the cream had to chill over night that I ran into my first problem. (I really do need to get better at reading the ENTIRE recipe before I start.) But, that was easily remedied...I'd just have to wait.

The pate choux recipe that was given worked like a charm for me. I used some of the tips I'd heard at the baking bootcamp classes and passed them along to my fellow Daring Bakers. The two that seemed to be most relevant were: 1) Dump all of the eggs in at once, not one at a time. I don't know why this works, but it does. Keep in mind that you must stir by hand with a wooden spoon and your arm will feel like it wants to fall off before you're done...this is normal. Smile! 2) As soon as the puffs come out of the oven, poke a hole in the top with a really sharp paring knife. This allows the steam to escape and helps the dough to not get soggy, thereby falling.

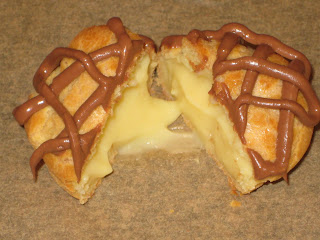
My puffs puffed beautifully, they stayed beautifully puffed. The creme came out super yummy. I was well on my way to Piece Montee success! It was once I started to fill the puffs that I realized, I shouldn't have halved the creme recipe as suggested. Sure, we were given two recipes (one for vanilla, which I made, and one for chocolate, which I thought I'd make but didn't), but I only made one. I didn't have a lot of finished creme puffs. But I pressed on thinking, "Ahh, no worries, it just won't be as tall!" This turned out to be true...and a bit sad.

The other area where I ran into trouble, I mean challenges which make me a better baker, were the stacking and glazing. Oh sure...chocolate was my choice, but only because making caramel still terrifies me. I know, I know... practice, practice, practice...but I wasn't in the mood to severely burn myself or ruin the few finished creme puffs I had. I don't think my chocolate glaze was much of a success though (as you'll see in the photos below).

Individually, the puffs looked and tasted wonderful. The filing was creamy and had just the right sweetness. The chocolate added a touch of glamour and the puff itself was airy and light. Ahh....if only the challenge had been to make creme puffs alone....

But, alas, the challenge was to stack these balls of deliciousness into a cone shape and drizzle beautifully. So, I started to stack, using chocolate as my glue. I think it went ok, it worked, it retained its shape and didn't fall over or crumble to the floor. That's success right?! Right?! :::Sigh:::

Once stacked, I turned to the glazing/drizzling part. I had a feeling now that this part of the challenge, which initially sounded like an afterthought, was going to be the most difficult. I was right. My chocolate should have been mixed into a ganache, but I didn't realize that until it was too late. SO, I got this:

Trust me, it tasted great....but I certainly won't be offering to make for a special occastion like a French wedding anytime soon....

This was a good reminder that sometimes, it's the simplest steps that trip us up. Onward....I will conquer caramel....someday....

The Recipe:
Piece Montée or Croquembouche
Preparation time:
 You will want to use your puff pastry batter and chocolate glaze or caramel as soon as it has been prepared and as close to serving time as possible. This is not a dessert that stores well and it may be a bit temperamental in humid areas as the glaze needs to harden to hold the choux together. The crème patissiere can be made a couple of days in advance and stored in the fridge until ready to use.

You will need approximately 10 minutes to prepare the puff pastry, 10 minutes to pipe and about 30 minutes to bake each batch. The crème patissiere should take about 10 minutes to cook and then will need to be cooled for at least 6 hours or overnight. The glazes take about 10 minutes to prepare.

Ingredients:

For the Vanilla Crème Patissiere (Half Batch)
1 cup (225 ml.) whole milk
2 Tbsp. cornstarch
6 Tbsp. (100 g.) sugar
1 large egg
2 large egg yolks
2 Tbsp. (30 g.) unsalted butter
1 Tsp. Vanilla

Dissolve cornstarch in ¼ cup of milk. Combine the remaining milk with the sugar in a saucepan; bring to boil; remove from heat.

Beat the whole egg, then the yolks into the cornstarch mixture. Pour 1/3 of boiling milk into the egg mixture, whisking constantly so that the eggs do not begin to cook.

Return the remaining milk to boil. Pour in the hot egg mixture in a stream, continuing whisking.

Continue whisking (this is important – you do not want the eggs to solidify/cook) until the cream thickens and comes to a boil. Remove from heat and beat in the butter and vanilla.

Pour cream into a stainless steel/ceramic bowl. Press plastic wrap firmly against the surface. Chill immediately and until ready to use.

For Chocolate Pastry Cream (Half Batch Recipe):
Bring ¼ cup (about 50 cl.) milk to a boil in a small pan; remove from heat and add in 3 ounces (about 80 g.) semisweet chocolate, finely chopped, and mix until smooth. Whisk into pastry cream when you add the butter and vanilla.

For Coffee Pastry Cream (Half Batch recipe)
Dissolve 1 ½ teaspoons instant espresso powder in 1 ½ teaspoons boiling water. Whisk into pastry cream with butter and vanilla.

Pate a Choux (Yield: About 28)
¾ cup (175 ml.) water
6 Tbsp. (85 g.) unsalted butter
¼ Tsp. salt
1 Tbsp. sugar
1 cup (125 g.) all-purpose flour
4 large eggs

For Egg Wash:
1 egg and pinch of salt

Pre-heat oven to 425◦F/220◦C degrees. Line two baking sheets with parchment paper.

Preparing batter:
Combine water, butter, salt and sugar in a saucepan over medium heat. Bring to a boil and stir occasionally. At boil, remove from heat and sift in the flour, stirring to combine completely.

Return to heat and cook, stirring constantly until the batter dries slightly and begins to pull away from the sides of the pan.

Transfer to a bowl and stir with a wooden spoon 1 minute to cool slightly.

Add 1 egg. The batter will appear loose and shiny.

As you stir, the batter will become dry-looking like lightly buttered mashed potatoes.

It is at this point that you will add in the next egg. Repeat until you have incorporated all the eggs.

Piping:
Transfer batter to a pastry bag fitted with a large open tip (I piped directly from the bag opening without a tip). Pipe choux about 1 inch-part in the baking sheets. Choux should be about 1 inch high about 1 inch wide.

Using a clean finger dipped in hot water, gently press down on any tips that have formed on the top of choux when piping. You want them to retain their ball shape, but be smoothly curved on top. Brush tops with egg wash (1 egg lightly beaten with pinch of salt).

Baking:
Bake the choux at 425◦F/220◦C degrees until well-puffed and turning lightly golden in color, about 10 minutes.

Lower the temperature to 350◦F/180◦C degrees and continue baking until well-colored and dry, about 20 minutes more. Remove to a rack and cool.

Can be stored in a airtight box overnight.

Filling:
When you are ready to assemble your piece montée, using a plain pastry tip, pierce the bottom of each choux. Fill the choux with pastry cream using either the same tip or a star tip, and place on a paper-lined sheet. Choux can be refrigerated briefly at this point while you make your glaze.

Use one of these to top your choux and assemble your piece montée.

Chocolate Glaze:
8 ounces/200 g. finely chopped chocolate (use the finest quality you can afford as the taste will be quite pronounced; I recommend semi-sweet)

Melt chocolate in microwave or double boiler. Stir at regular intervals to avoid burning. Use the best quality chocolate you can afford. Use immediately.

Hard Caramel Glaze:
1 cup (225 g.) sugar
½ teaspoon lemon juice

Combine sugar and lemon juice in a saucepan with a metal kitchen spoon stirring until the sugar resembles wet sand. Place on medium heat; heat without stirring until sugar starts to melt around the sides of the pan and the center begins to smoke. Begin to stir sugar. Continue heating, stirring occasionally until the sugar is a clear, amber color. Remove from heat immediately; place bottom of pan in ice water to stop the cooking. Use immediately.

Assembly of your Piece Montée:
You may want to lay out your unfilled, unglazed choux in a practice design to get a feel for how to assemble the final dessert. For example, if making a conical shape, trace a circle (no bigger than 8 inches) on a piece of parchment to use as a pattern. Then take some of the larger choux and assemble them in the circle for the bottom layer. Practice seeing which pieces fit together best.

Once you are ready to assemble your piece montée, dip the top of each choux in your glaze (careful it may be still hot!), and start assembling on your cake board/plate/sheet. Continue dipping and adding choux in levels using the glaze to hold them together as you build up.
When you have finished the design of your piece montée, you may drizzle with remaining glaze or use ribbons, sugar cookie cut-outs, almonds, flowers, etc. to decorate. Have fun and enjoy! Bon appétit!

Enjoy With Love,
Christina

Saturday, March 27, 2010

Daring Bakers: Orange Tian (March 2010)

The 2010 March Daring Baker’s challenge was hosted by Jennifer of Chocolate Shavings. She chose Orange Tian as the challenge for this month, a dessert based on a recipe from Alain Ducasse’s Cooking School in Paris.

This recipe looked difficult with all of its parts and steps, but honestly, once you get into it and take each step as it comes it's actually not that difficult. Here's what our host Jennifer had to say:

"This is a scrumptious dessert that I made for the first time a few months ago at the Alain Ducasse Cooking School in Paris, France. The dessert is made of different layers: a pate sablee with orange marmalade, a flavored whipped cream topped with fresh orange segments and served with a caramel and orange sauce. You build the dessert upside down and then unmold the dessert so that the bottom layer (the orange segments) becomes the top layer. I really enjoy making this dessert, it’s wonderfully citrusy, elegant and fun to put together."

The hardest part of this whole dessert for me was the caramel step. Mine never really did set up properly and I didn't bother to try again. I made mine in a springform pan and then unmolded the morning I took it in. It was in the freezer for days versus minutes and was still fine. It is best served when it's thawed but still slightly cold....so the 10 minutes is probably right...I just can't plan like that! :-)

The dessert was a big hit at the office. It is light and airy, citrusy and the pate sablee is divine! I would make it again for someone that wanted a dessert that wasn't traditional cake or pie. I may skip some of the more labor intensive steps like making my own marmalade next time.


The Recipe: Orange Tian
Preparation time:

- Pate Sablee: 20 minutes to make, 30 minutes to rest, 15 minutes to roll out, 20 minutes to bake
- Marmalade: 20 minutes to make, 30 minutes to blanch
- Orange segments: 20 minutes, overnight to sit
- Caramel: 15 minutes, overnight to sit
- Whipped Cream: 15 minutes
- Assembling: 20 minutes
- Freezer to Set: 10 minutes

For the Pate Sablee:
2 medium-sized egg yolks at room temperature
Granulated sugar 6 tablespoons + 1 teaspoon; 2.8 oz; 80 grams
Vanilla extract ½ teaspoon
Unsalted butter ¼ cup + 3 tablespoons; 3.5 oz; 100 grams ice cold, cubed
Salt 1/3 teaspoon; 2 grams
All-purpose flour 1.5 cup + 2 tablespoons; 7 oz; 200 grams
Baking powder 1 teaspoon ; 4 grams

Directions:
Put the flour, baking powder, ice cold cubed butter and salt in a food processor fitted with a steel blade.

In a separate bowl, add the eggs yolks, vanilla extract and sugar and beat with a whisk until the mixture is pale. Pour the egg mixture in the food processor.

Process until the dough just comes together. If you find that the dough is still a little too crumbly to come together, add a couple drops of water and process again to form a homogenous ball of dough. Form into a disc, cover with plastic wrap and leave to rest in the fridge for 30 minutes.

Preheat your oven to 350 degree Fahrenheit.

Roll out the dough onto a lightly floured surface until you obtain a ¼ inch thick circle.

Using your cookie cutter, cut out circles of dough and place on a parchment (or silicone) lined baking sheet. Bake for 20 minutes or until the circles of dough are just golden.

For the Marmalade:
Freshly pressed orange juice ¼ cup + 3 tablespoons; 3.5 oz; 100 grams
1 large orange used to make orange slices
Cold water to cook the orange slices
Pectin 5 grams
Granulated sugar: use the same weight as the weight of orange slices once they are cooked

Finely slice the orange. Place the orange slices in a medium-sized pot filled with cold water. Simmer for about 10 minutes, discard the water, re-fill with cold water and blanch the oranges for another 10 minutes.

Blanch the orange slices 3 times. This process removes the bitterness from the orange peel, so it is essential to use a new batch of cold water every time when you blanch the slices. Once blanched 3 times, drain the slices and let them cool.

Once they are cool enough to handle, finely mince them (using a knife or a food processor).

Weigh the slices and use the same amount of granulated sugar. If you don’t have a scale, you can place the slices in a cup measurer and use the same amount of sugar.

In a pot over medium heat, add the minced orange slices, the sugar you just weighed, the orange juice and the pectin. Cook until the mixture reaches a jam consistency (10-15 minutes). Transfer to a bowl, cover with plastic wrap and put in the fridge.

For the Orange Segments:
For this step you will need 8 oranges.
Cut the oranges into segments over a shallow bowl and make sure to keep the juice. Add the segments to the bowl with the juice.
YouTube link on how to segment an orange.

For the Caramel:
Granulated sugar 1 cup; 7 oz; 200 grams
Orange juice 1.5 cups + 2 tablespoons; 14 oz; 400 grams

Place the sugar in a pan on medium heat and begin heating it.

Once the sugar starts to bubble and foam, slowly add the orange juice. As soon as the mixture starts boiling, remove from the heat and pour half of the mixture over the orange segments.

Reserve the other half of the caramel mixture in a small bowl — you will use this later to spoon over the finished dessert. When the dessert is assembled and setting in the freezer, heat the kept caramel sauce in a small saucepan over low heat until it thickens and just coats the back of a spoon (about 10 minutes). You can then spoon it over the orange tians.

[Tip: Be very careful when making the caramel — if you have never made caramel before, I would suggest making this step while you don’t have to worry about anything else. Bubbling sugar is extremely, extremely hot, so make sure you have a bowl of ice cold water in the kitchen in case anyone gets burnt!]

For the Whipped Cream:
Heavy whipping cream 1 cup; 7 oz; 200 grams
3 tablespoons of hot water
1 tsp Gelatine
1 tablespoon of confectioner's sugar
Oange Marmalade (see recipe above) 1 tablespoon

In a small bowl, add the gelatine and hot water, stirring well until the gelatine dissolves. Let the gelatine cool to room temperature while you make the whipped cream. Combine the cream in a chilled mixing bowl. Whip the cream using a hand mixer on low speed until the cream starts to thicken for about one minute. Add the confectioner sugar. Increase the speed to medium-high. Whip the cream until the beaters leave visible (but not lasting) trails in the cream, then add the cooled gelatine slowly while beating continuously. Continue whipping until the cream is light and fluffy and forms soft peaks. Transfer the whipped cream to a bowl and fold in the orange marmalade.

[Tip: Use an ice cold bowl to make the whipped cream in. You can do this by putting your mixing bowl, cream and beater in the fridge for 20 minutes prior to whipping the cream.]

Assembling the Dessert:
Make sure you have some room in your freezer. Ideally, you should be able to fit a small baking sheet or tray of desserts to set in the freezer.

Line a small tray or baking sheet with parchment paper or a silicone sheet. Lay out 6 cookie cutters onto the parchment paper/silicone.

Drain the orange segments on a kitchen towel.

Have the marmalade, whipped cream and baked circles of dough ready to use.

Arrange the orange segments at the bottom of each cookie cutter. Make sure the segments all touch either and that there are no gaps. Make sure they fit snuggly and look pretty as they will end up being the top of the dessert. Arrange them as you would sliced apples when making an apple tart.

Once you have neatly arranged one layer of orange segments at the bottom of each cookie cutter, add a couple spoonfuls of whipped cream and gently spread it so that it fills the cookie cutter in an even layer.

Leave about 1/4 inch at the top so there is room for dough circle.

Using a butter knife or small spoon, spread a small even layer of orange marmalade on each circle of dough.

Carefully place a circle of dough over each ring (the side of dough covered in marmalade should be the side touching the whipping cream). Gently press on the circle of dough to make sure the dessert is compact.

Place the desserts to set in the freezer to set for 10 minutes.

Using a small knife, gently go around the edges of the cookie cutter to make sure the dessert will be easy to unmold. Gently place your serving plate on top of a dessert (on top of the circle of dough) and turn the plate over. Gently remove the cookie cutter, add a spoonful of caramel sauce and serve immediately.

Enjoy With Love,
Christina

Saturday, February 27, 2010

Darking Bakers: Tiramisu (February 2010)

The February 2010 Daring Bakers’ challenge was hosted by Aparna of My Diverse Kitchen and Deeba of Passionate About Baking. They chose Tiramisu as the challenge for the month. Their challenge recipe is based on recipes from The Washington Post, Cordon Bleu at Home and Baking Obsession.

Here's a bit about Tiramisu from our challenge hosts:
"This divine Italian dessert translates to mean ‘pick me up’, supposedly referring to the ‘kick’ provided by the strong coffee, sugar and alcohol in it!

On the other hand, a slight mistake in spelling it as "Tiramuso" could end up meaning that you were "pulling a sulky face"! Classic tiramisu is made of alternate layers of espresso soaked ladyfinger biscuits and a cream made from mascarpone cheese and zabaglione (an egg custard).

The perfect Tiramisu is a balance of flavors of a sweet zabaglione, strong coffee, marsala wine, creamy mascarpone cheese and the dusting of unsweetened cocoa.

So when, where and how was tiramisu born?
Tiramisu is said to have its origins in Treviso (Italy), and there are quite a few stories about how it came to be created.

One story traces the tiramisu as far back as the Renaissance claiming that it was first made in honour of the visit of Grand Duke Cosimo di Medici to Tuscany. Yet another one points to the tiramisu being an adaptation of the "Zuppa Inglese" referring to the sponge cake and cream layered English Trifle.

However, experts in this area generally agree that the tiramisu as we know it today, was born in the ‘70s.

Some believe that the Tiramisu was created in the Le Beccherie (a restaurant in Treviso). Others suggest that Tiramisu was first made in 1971 by an Italian baker named Carminantonio Iannaccone in a small bakery in Treviso, Italy."

What a challenge this was! I was excited to try my hand at this dessert, though I typically do not enjoy it while out and about at restaurants. I find that the texture (fairly mushy) is not my favorite, the coffee flavor is not something I enjoy and if I'm going to have dessert there are usually a plethora of other items on the menu I would rather have.

That said, I have always wanted to know how it was made so that I could possibly change it up to make it into something that I would enjoy. You see, in my quest to become an Italian Nonna (grandma), this would need to be a staple in my recipe box. Also, since I had just taken a pastry class from an Italian chef, I was feeling inspired when I started to tackle this challenge.

(Instead of showing you the step by step of the recipe, I thought I would share my thoughts...let me know what you prefer!).

The recipe was very well written and easy to follow once you have all the ingredients. I will say that my sink is FULL of dishes though. It seemed that each thing used a bowl along with a this or that. I'm not complaining, I love a sink full of dishes as long as the result is worth it.

I did not make the mascarpone cheese from scratch. I could not find the proper kind of cream. The other Bakers in our private forum said to shy away from using ultra-pasteurized cream, which is all I could find. I suppose I could have made the 45 minute trek out to "the country" to a place that sells direct from a dairy, but honestly I did not have the time or mental energy to do that this time. Sorry to the hosts, but I passed on this part (hoping it would not fully disqualify me as a participant).

The ladyfingers were probably the most challenging for me due the folding and egg whites. I know I need to practice with those more in order to become more competent and confident. They seemed to turn out really well though. The part that I thought was fairly simple was the custards. BUT, it seems that like any good challenge those parts that you think will be simple turn out to be a challenge and vice versa.

My custards didn't seem to want to set. As you will see in the glamour shot, the top layer is a bit goopy (is that a word!?). I am going to consult with my new Italian chef friend to see if he can diagnose what went wrong.

I am also not sure I soaked the ladyfingers long enough in the sweetened espresso. As most of you that ready my ramblings here know, I am not a coffee girl... ick.... so I think I thought that if I barely dunked the ladyfingers that the flavor would be reduced. Of course, this could be true, but at the same time it changed the dish a bit. The ladyfingers were still fairly "solid" when I cut into the dessert.

The one thing that did surprise me was how absolutely easy (and delicious!) the whipped cream was! I know I had seen fresh whipped cream made on tv before, heard all about how easy it was, but never really believed it was *that* easy....but it is! I literally dumped the ingredients in the trusty Kitchen Aid, attached the whisk, turn it on and *poof* a few minutes later I had really delicious whipped cream! Try this if nothing else!

Taste...OK, I have to admit. At the time I am posting this I've not actually tasted the whole thing. I've tasted the goopy cream, which was really good. I tried a ladyfinger and thought that while good, it would likely not be very good on its own (which is likely why they are normally incorporated into other desserts). I am hoping to convince myself to try a small piece later just so I can report back. In the meantime, I am also gathering feedback from my co-workers as I brought in the dish to share. Check back for an update!

UPDATE: So I finally got an opportunity to taste my creation. I must say it was good, but the coffee flavor was too much for me to make it through a whole serving. Feedback from the people at work was that it was really good. One person did say that the ladyfingers were a bit dry, but not so bad that they did not finish the portion they took. SO...my recommendation is that if you enjoy tiramisu, give this a go....if you are like me and are not/were not too fond of it before, you likely will not like this version either. Piacere! (Italian for Enjoy!)
The not-so-glamorous glamor shot
PS: Happy Anniversary to me! This blog has now been up
and cooking for one year!
Thanks to everyone who reads it...if you have any suggestions,
recommendations or requests, please let me know!
The Recipe: Tiramisu
The recipes for this challenge are presented in the following order:
A. Tiramisu (includes zabaglione and vanilla pastry cream)
B. Mascarpone Cheese
C. Ladyfinger/ Savoiardi Biscuits

PREPARATION TIME:
Tiramisu is made up of several components which can be made separately and ahead of time and put together the day before serving. Making tiramisu from scratch requires about 2 to 3 days (including refrigeration) from when you start making the mascarpone to the time the tiramisu is served.

The zabaglione and pastry cream also need 4 hours to an overnight for chilling, as does the main dessert. The flavours mature after an overnight rest, and the dessert can be kept refrigerated for 2-3 days.
Once assembled, the tiramisu can be frozen till you need to serve it, in case you are not serving it immediately.

TIRAMISU
(Recipe source: Carminantonio's Tiramisu from The Washington Post, July 11 2007 )
This recipe makes 6 servings

Ingredients:

For the zabaglione:
2 large egg yolks
3 tablespoons sugar/50gms
1/4 cup/60ml Marsala wine (or port or coffee)
1/4 teaspoon/ 1.25ml vanilla extract
1/2 teaspoon finely grated lemon zest

For the vanilla pastry cream:
1/4 cup/55gms sugar
1 tablespoon/8gms all purpose flour
1/2 teaspoon finely grated lemon zest
1/2 teaspoon/ 2.5ml vanilla extract
1 large egg yolk
3/4 cup/175ml whole milk

For the whipped cream:
1 cup/235ml chilled heavy cream (we used 25%)
1/4 cup/55gms sugar
1/2 teaspoon/ 2.5ml vanilla extract
To assemble the tiramisu:
2 cups/470ml brewed espresso, warmed
1 teaspoon/5ml rum extract (optional)
1/2 cup/110gms sugar
1/3 cup/75gms mascarpone cheese
36 savoiardi/ ladyfinger biscuits (you may use less)
2 tablespoons/30gms unsweetened cocoa powder
Method:
For the zabaglione:

Heat water in a double boiler. If you don’t have a double boiler, place a pot with about an inch of water in it on the stove. Place a heat-proof bowl in the pot making sure the bottom does not touch the water.
In a large mixing bowl (or stainless steel mixing bowl), mix together the egg yolks, sugar, the Marsala (or espresso/ coffee), vanilla extract and lemon zest. Whisk together until the yolks are fully blended and the mixture looks smooth.

Transfer the mixture to the top of a double boiler or place your bowl over the pan/ pot with simmering water. Cook the egg mixture over low heat, stirring constantly, for about 8 minutes or until it resembles thick custard. It may bubble a bit as it reaches that consistency.

Let cool to room temperature and transfer the zabaglione to a bowl. Cover and refrigerate at least 4 hours or overnight, until thoroughly chilled.

For the pastry cream:
Mix together the sugar, flour, lemon zest and vanilla extract in a medium heavy-bottomed saucepan. To this add the egg yolk and half the milk. Whisk until smooth.

Now place the saucepan over low heat and cook, stirring constantly to prevent the mixture from curdling.

Add the remaining milk a little at a time, still stirring constantly. After about 12 minutes the mixture will be thick, free of lumps and beginning to bubble. (If you have a few lumps, don’t worry. You can push the cream through a fine-mesh strainer.)

Transfer the pastry cream to a bowl and cool to room temperature. Cover with plastic film and refrigerate at least 4 hours or overnight, until thoroughly chilled.

For the whipped cream:
Combine the cream, sugar and vanilla extract in a mixing bowl. Beat with an electric hand mixer or immersion blender until the mixture holds stiff peaks. Set aside.

To assemble the tiramisu:
Have ready a rectangular serving dish (about 8" by 8" should do) or one of your choice.

Mix together the warm espresso, rum extract and sugar in a shallow dish, whisking to mix well. Set aside to cool.

In a large bowl, beat the mascarpone cheese with a spoon to break down the lumps and make it smooth. This will make it easier to fold. Add the prepared and chilled zabaglione and pastry cream, blending until just combined. Gently fold in the whipped cream. Set this cream mixture aside.

Now to start assembling the tiramisu.
Workings quickly, dip 12 of the ladyfingers in the sweetened espresso, about 1 second per side. They should be moist but not soggy. Immediately transfer each ladyfinger to the platter, placing them side by side in a single row. You may break a lady finger into two, if necessary, to ensure the base of your dish is completely covered.

Spoon one-third of the cream mixture on top of the ladyfingers, then use a rubber spatula or spreading knife to cover the top evenly, all the way to the edges.

Repeat to create 2 more layers, using 12 ladyfingers and the cream mixture for each layer. Clean any spilled cream mixture; cover carefully with plastic wrap and refrigerate the tiramisu overnight.

To serve, carefully remove the plastic wrap and sprinkle the tiramisu with cocoa powder using a fine-mesh strainer or decorate as you please. Cut into individual portions and serve.

MASCARPONE CHEESE
(Source: Vera’s Recipe for Homemade Mascarpone Cheese)
This recipe makes 12oz/ 340gm of mascarpone cheese

Ingredients:
474ml (approx. 500ml)/ 2 cups whipping (36 %) pasteurized (not ultra-pasteurized), preferably organic cream (between 25% to 36% cream will do)
1 tablespoon fresh lemon juice

Method:
Bring 1 inch of water to a boil in a wide skillet. Reduce the heat to medium-low so the water is barely simmering. Pour the cream into a medium heat-resistant bowl, then place the bowl into the skillet. Heat the cream, stirring often, to 190 F. If you do not have a thermometer, wait until small bubbles keep trying to push up to the surface.

It will take about 15 minutes of delicate heating. Add the lemon juice and continue heating the mixture, stirring gently, until the cream curdles. Do not expect the same action as you see during ricotta cheese making. All that the whipping cream will do is become thicker, like a well-done crème anglaise. It will cover a back of your wooden spoon thickly. You will see just a few clear whey streaks when you stir. Remove the bowl from the water and let cool for about 20 minutes. Meanwhile, line a sieve with four layers of dampened cheesecloth and set it over a bowl. Transfer the mixture into the lined sieve. Do not squeeze the cheese in the cheesecloth or press on its surface (be patient, it will firm up after refrigeration time). Once cooled completely, cover with plastic wrap and refrigerate (in the sieve) overnight or up to 24 hours.

Vera’s notes: The first time I made mascarpone I had all doubts if it’d been cooked enough, because of its custard-like texture. Have no fear, it will firm up beautifully in the fridge, and will yet remain lusciously creamy.

Keep refrigerated and use within 3 to 4 days.

LADYFINGERS/ SAVOIARDI BISCUITS
(Source: Recipe from Cordon Bleu At Home)
This recipe makes approximately 24 big ladyfingers or 45 small (2 1/2" to 3" long) ladyfingers.

Ingredients:
3 eggs, separated
6 tablespoons /75gms granulated sugar
3/4 cup/95gms cake flour, sifted (or 3/4 cup all purpose flour + 2 tbsp corn starch)
6 tablespoons /50gms confectioner's sugar

Method:
Preheat your oven to 350 F (175 C) degrees, then lightly brush 2 baking sheets with oil or softened butter and line with parchment paper.

Beat the egg whites using a hand held electric mixer until stiff peaks form. Gradually add granulate sugar and continue beating until the egg whites become stiff again, glossy and smooth.

In a small bowl, beat the egg yolks lightly with a fork and fold them into the meringue, using a wooden spoon. Sift the flour over this mixture and fold gently until just mixed. It is important to fold very gently and not overdo the folding. Otherwise the batter would deflate and lose volume resulting in ladyfingers which are flat and not spongy.

Fit a pastry bag with a plain tip (or just snip the end off; you could also use a Ziploc bag) and fill with the batter. Pipe the batter into 5" long and 3/4" wide strips leaving about 1" space in between the strips.

Sprinkle half the confectioner's sugar over the ladyfingers and wait for 5 minutes. The sugar will pearl or look wet and glisten. Now sprinkle the remaining sugar. This helps to give the ladyfingers their characteristic crispness.

Hold the parchment paper in place with your thumb and lift one side of the baking sheet and gently tap it on the work surface to remove excess sprinkled sugar.

Bake the ladyfingers for 10 minutes, then rotate the sheets and bake for another 5 minutes or so until the puff up, turn lightly golden brown and are still soft.

Allow them to cool slightly on the sheets for about 5 minutes and then remove the ladyfingers from the baking sheet with a metal spatula while still hot, and cool on a rack.

Store them in an airtight container till required. They should keep for 2 to 3 weeks.

NOTES/ TIPS FROM DARING BAKER HOSTS:
  • If you cannot find Marsala, port wine is considered a good substitute.
  • If you would rather not use alcohol in your tiramisu due to diet restrictions or because you want to serve it to children, you may replace the Marsala with an equal amount of espresso or coffee.
  • Many people, especially those who are not excessively fond of coffee, might find brewed espresso very strong. In this case, please feel free to dilute the espresso or coffee to the desired strength.
  • It is generally suggested that cream with 25% fat is best for making mascarpone, but 36% works just as well.
  • It is acceptable to use lime juice in the marscapone cheese.
  • The mascarpone recipe below is for approximately 340gms of mascarpone. The tiramisu recipe requires only 1/3 cup/75gms so you may scale down the recipe to requirement or put the extra mascarpone cheese to other equally good use. (100gms cream will yield approximately 75gms mascarpone)
  • While using the double boiler to make the mascarpone as well as the zabaglione, always ensure that the bottom of the bowl on top doesn't touch the bottom of the lower one. It is important to use a stainless steel bowl to pour your cream into, while making the mascarpone.
  • Ladyfinger batter is very fragile so fold in the flour and yolks very carefully into the meringue so that the whites don't lose their volume.
  • It might be a good idea to decide the size of the dish in which you intend to set the dessert, and make the fingers to a size which would fit that dish. This makes it easier when assembling the tiramisu later. Do remember that ladyfingers/ savioardi puff up a little while baking.
  • Ladyfinger biscuits may be stored up to a week in an airtight container.
  • Placing the bowl (in which cream is to be whipped) and the beaters of the hand held electric mixer in the fridge for about 1/2 to 1 hour before hand makes the cream whip up very well.
  • Do not dip the ladyfinger/ savoiardi into the coffee solution for more than ONE second, or they might become very fragile & disintegrate. Extra soaking is likely to spoil the end product, making it soggy.
  • If you would like to de-mould your tiramisu from your dish (cutting can be easier and neater this way, you can line your dish with plastic wrap (leaving a little extra on the sides of the dish) and then start assembling your tiramisu. Once the tiramisu sets in the refrigerator, you can use the overhang to pull the tiramisu out of the dish.
Enjoy with Love,
Christina

Wednesday, January 27, 2010

Daring Bakers: Nanaimo Bars with Gluten-Free Graham Wafers (January 2010)

The January 2010 Daring Bakers’ challenge was hosted by Lauren of Celiac Teen. Lauren chose Gluten-Free Graham Wafers and Nanaimo Bars as the challenge for the month. The sources she based her recipe on are 101 Cookbooks and www.nanaimo.ca.

Ahh the Olympics! I love the Olympics! They are just around the corner and the Daring Bakers are honoring the host country, Canada, with this month's challenge. Our host is from Canada and she chose a traditional Canadian dessert bar.

Lauren says, "Nanaimo Bars are a classic Canadian dessert created in none other than Nanaimo, British Colombia. In case you were wondering, it’s pronounced Nah-nye-Moh. These bars have 3 layers: a base containing graham crackers, cocoa, coconut and nuts, a middle custard layer, and a topping of chocolate. They are extremely rich and available almost everywhere across the country."

Lauren also has Celiac Disease so she challenged us to make our Nanaimo Bars gluten-free! I know very little about Celiac or the gluten-free lifestyle, so this was a great introduction into that for me.

The first part of the challenge was to make our own gluten-free graham crackers. I had a hard time finding the special flours needed so I just purchased gluten-free all-purpose baking mix and hoped for the best. The dough came together fairly easy. The only issue was that it was SO STICKY! Even after rolling it out a bit with a lot of (gluten-free) "flour" on the counter, I had trouble moving it to plastic wrap. I would suggest that you dump it right out onto the plastic wrap....save a step and a mess!


I chilled my dough overnight, but I was surprised at how soft it was even after that. I rolled it out onto parchment paper because other Daring Bakers had said that it was difficult to transfer to the baking sheet. I'm glad I did this because I can see how it would have been a challenge because the dough softened so quickly, turning a bit sticky again.


One re-chilled, the dough was off to the oven. I must say, it smelled wonderful! The honey and vanilla really shine through while baking. They didn't quite turn out as solid as I'd thought they would, but since I was just going to whirl them into crumbs for the bars, I didn't mind. Honestly, the taste of the graham crakers alone was a little to be desired...but they were decent. I may try them again with "wheat flour" to see if that helps with both the consistency and the flavor.


Once the graham crackers cooled, I started to make the bars. The ingredients were easy to find and what you would normally find in desserts. I found that a bit surprising because of the challenge to be gluten-free. I suppose I never really thought about what did or did not have gluten in it.

Since I don't have a traditional double-boiler, I use the old fashioned pot with a bowl on top method. It works great except you have to be careful for the steam escaping. The bottom layer had me worried. It involves adding an egg to the warm chocolate. I added a bit of the chocolate to the egg and then added that to the rest of the mixture. It worked out great although it did have me worried at one point...it does not look glamourous at first....but keep going, it comes together!


The custard layer is my favorite! It is pulled together much like a frosting or icing would be. This is made a ton easier by remembering to have room temperature butter. I used vanilla pudding, because I could not find the custard powder that was suggested.


For the final layer, I used my microwave. I find it easier when you just have the chocolate and butter to zap it instead of doing it on the stovetop. I'm sure our great-grandmothers would have loved to have this choice! The trick with using the microwave for this is to set it for less time than you would think it would take and then slowly add if necessary. I find that for 4 ounces of chocolate with 2 tablespoons of butter my microwave takes about 30-40 seconds....then stir, stir, stir! Of course, this receipe requires that the chocolate then cool down a bit before pouring it onto the custard layer. Don't skip this step! Mine was fairly cool and still tried to mix a bit along the edges. Another tip: Use an off-set spatula for this step. It made it a lot easier!


I then chilled the whole thing overnight. The top layer becomes hard again. It's really solid and a bit difficult to cut. I must say though that the end result is beautiful! Very layered and precise in those layers. After taking the glamour shot I took the pan to work and shared with my co-workers. They raved! I thought that they were really good, though the bottom layer was an interesting texture for me. I swapped out the coconut and put oatmeal in its place...but I can see where coconut would be very good in these (if you like coconut, which I don't).


All-in-all, this is a quick easy dessert that was a big hit! I'd make it again, especially since the ingredients are common enough (the wheat version at least!) that I'd likely have most of it on hand. Thanks to Lauren for a fun challenge, educating us on Celiac and introducing us to a truly Canadian dessert. While watching the Olympics this year I will enjoy knowing that I know a bit more about the host country and their foods.....but I must say....
GO TEAM USA!!!

The Recipe:
Preparation time:

Graham Wafers: 30 to 45 minutes total active prep, 2 ½ hours to overnight and 45 minutes inactive prep.
Nanaimo Bars: 30 minutes.

Equipment required:
  • Food Processor
  • Bowls
  • Parchment paper or silpats
  • Cookie sheets
  • Double boiler or pot and heatproof bowl
  • 8 by 8 inch square pan
  • Hand mixer or stand
  • Saucepan

For Gluten-Free Graham Wafers
1 cup (138 g) (4.9 ounces) Sweet rice flour (also known as glutinous rice flour)
3/4 cup (100 g) (3.5 ounces) Tapioca Starch/Flour
1/2 cup (65 g) (2.3 ounces) Sorghum Flour
1 cup (200 g) (7.1 ounces) Dark Brown Sugar, Lightly packed
1 teaspoon (5 mL) Baking soda
3/4 teaspoon (4 mL ) Kosher Salt
7 tablespoons (100 g) (3 ½ ounces) Unsalted Butter (Cut into 1-inch cubes and frozen)
1/3 cup (80 mL) Honey, Mild-flavoured such as clover
5 tablespoons (75 mL) Whole Milk
2 tablespoons (30 mL) Pure Vanilla Extract

* Note: I used 2 1/2 cups Gluten-Free All-Purpose Baking Mix instead of the above flours. You could also use the same amount of regular all-purpose flour, though it would no longer be gluten-free.

Directions:
1. In the bowl of a food processor fitted with a steel blade, combine the flours, brown sugar, baking soda, and salt. Pulse on low to incorporate. Add the butter and pulse on and off, until the mixture is the consistency of a coarse meal. If making by hand, combine aforementioned dry ingredients with a whisk, then cut in butter until you have a coarse meal. No chunks of butter should be visible.

2. In a small bowl or liquid measuring cup, whisk together the honey, milk and vanilla. Add to the flour mixture until the dough barely comes together. It will be very soft and sticky.

3. Turn the dough onto a surface well-floured with sweet rice flour and pat the dough into a rectangle about 1 inch thick. Wrap in plastic and chill until firm, about 2 hours, or overnight.

4. Divide the dough in half and return one half to the refrigerator. Sift an even layer of sweet rice flour onto the work surface and roll the dough into a long rectangle, about 1/8 inch thick. The dough will be quite sticky, so flour as necessary. Cut into 4 by 4 inch squares. Gather the scraps together and set aside. Place wafers on one or two parchment-lined baking sheets. Chill until firm, about 30 to 45 minutes. Repeat with the second batch of dough.

5. Adjust the rack to the upper and lower positions and preheat oven to 350 degrees Fahrenheit (180 degrees Celsius).

6. Gather the scraps together into a ball, chill until firm, and reroll. Dust the surface with more sweet rice flour and roll out the dough to get a couple more wafers.

7. Prick the wafers with toothpick or fork, not all the way through, in two or more rows.

8. Bake for 25 minutes, until browned and slightly firm to the touch, rotating sheets halfway through to ensure even baking. Might take less, and the starting location of each sheet may determine its required time. The ones that started on the bottom browned faster.

9. When cooled completely, place enough wafers in food processor to make 1 ¼ cups (300 mL) of crumbs. Another way to do this is to place in a large ziplock bag, force all air out and smash with a rolling pin until wafers are crumbs.

Nanaimo Bars
For Nanaimo Bars — Bottom Layer
1/2 cup (115 g) (4 ounces) Unsalted Butter
1/4 cup (50 g) (1.8 ounces) Granulated Sugar
5 tablespoons (75 mL) Unsweetened Cocoa
1 Large Egg, Beaten
1 1/4 cups (300 mL) (160 g) (5.6 ounces) Gluten Free Graham Wafer Crumbs (See previous recipe)
1/2 cup (55 g) (1.9 ounces) Almonds (Any type, Finely chopped)
1 cup (130 g) (4.5 ounces) Coconut (Shredded, sweetened or unsweetened)

*Note: I used oatmeal instead of coconut.

For Nanaimo Bars — Middle Layer
1/2 cup (115 g) (4 ounces) Unsalted Butter
2 tablespoons and 2 teaspoons (40 mL) Heavy Cream
2 tablespoons (30 mL) Vanilla Custard Powder (Such as Bird’s. Vanilla pudding mix may be substituted.)
2 cups (254 g) (8.9 ounces) Icing Sugar

For Nanaimo Bars — Top Layer
4 ounces (115 g) Semi-sweet chocolate
2 tablespoons (28 g) (1 ounce) Unsalted Butter

Directions:
1. For bottom Layer: Melt unsalted butter, sugar and cocoa in top of a double boiler. Add egg and stir to cook and thicken. Remove from heat. Stir in crumbs, nuts and coconut. Press firmly into an ungreased 8 by 8 inch pan.

2. For Middle Layer: Cream butter, cream, custard powder, and icing sugar together well. Beat until light in colour. Spread over bottom layer.

3. For Top Layer: Melt chocolate and unsalted butter over low heat. Cool. Once cool, pour over middle layer and chill.

Enjoy with Love,
Christina